

Who else is loving the new Site Publisher feature on cPanel? (If you’re not sure what I’m talking about, check out cPanel’s blog post I Just Want a Site.) I’ve just recently had a chance to start playing around with it- so cool! The one noteworthy item to mention beforehand: Site Publisher is great for it’s intended purpose, to get a site up and running quickly. If you’re wanting any more than a landing page, you might be better off using something else.
Tim Owens just recently published a how-to for Site Publisher as Reclaim Hosting’s third episode in a new video series called Reclaim Your Domain:
Psst.. if you’re comparing notes between the cPanel blog post that I linked to above and the video here, you’ll notice that Reclaim has added extra templates within the interface. Yay for more choices!
It really does take all of two minutes to get something live. (Check out my quick creation here: landing.labrumfield.com.) However I couldn’t help but think: what if I didn’t want to use one of these templates? What if I wanted something else? These questions led me to discovering this little link at the bottom of the site publisher landing page:
HTML5 UP is a great repository of beautiful and responsive templates for static HTML pages. And with a little SFTP & HTML editing, you can get one of these babies up and running pretty quickly too. Ok, not two-minutes-quick, but arguably faster than building a dynamic WordPress site from scratch. So that’s what this post is about- to eradicate any fears you may have about working with your File Manager, and give you step-by-step instructions for uploading a simple HTML template straight to your site.
Where to start:
You’ll want to begin first by making sure you have an available space to add a template. I guess this partly goes without saying, but its a nice reminder if you’re looking to test something out. Go ahead and create a subdomain now solely for this project. That way you can play around free of worries that you’re going to accidentally erase something important. For the purposes of this project, I’m going to be working on portfolio.labrumfield.com. (Reclaim users: if you’re unsure how to create a subdomain, follow the first part of this guide.)
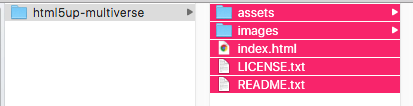
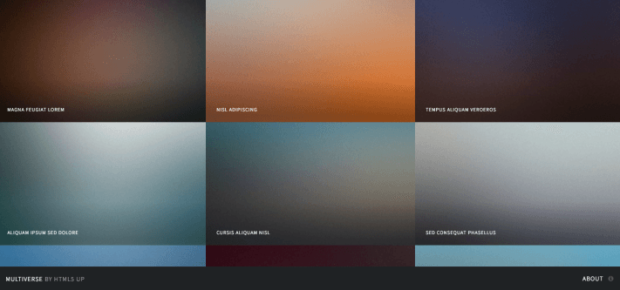
Secondly, you’ll want to download the theme of your choosing. I really liked Multiverse, so that’s the one I’ll be working with. Make sure to unzip file! A lot of users will try and upload the .zip file straight into their file manager.. this will not work.
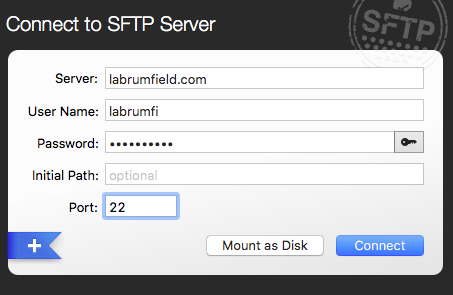
As a final precursor, go ahead and make an SFTP connection. I suppose you could technically upload one measly file at a time to your File Manager, but you really can’t beat the drag& drop method with SFTP. Follow this guide if you’re unsure how to create a connection. There are so many different FTP clients you can work with, but I think my favorites for the Mac are Cyberduck and Transmit.
Putting the theme in place:
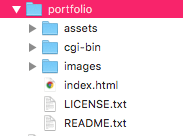
Within your FTP Client, go to your public_html folder and find the subdomain folder that you just recently created. Since my subdomain is portfolio.labrumfield.com, the folder I’m going to be looking for is called portfolio.
Now grab everything inside your template download folder a drag it into your subdomain folder.
Your subdomain folder should now look something like this:
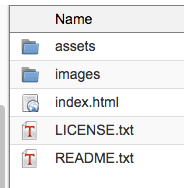
Congrats, you just used good ole fashioned FTP to move some data! Now when you head to your File Manager within your cPanel, you should be able to see your new content resting happily. So for me, this will look like public_html>portfolio:
Now when I go to portfolio.labrumfield.com, I see what looks very similar to the HTML5 UP demo site:
The fun part:
Obviously I need to tweak a few things so my page doesn’t include the generic photos & text. File Manager will recognize the file called index.html as the homepage (for more information on folder structures click here) so that’s where I’m headed to make some changes.
This is sort of where you get to play around. Save your changes and then refresh your page to see how it looks on the live version. Refreshing your page often can give you a great idea of where you are on the site if you’re unsure. Here are a few examples of easy changes you can make:
Editing the following code will change the text located on your browser tab:
<title>Multiverse by HTML5 UP</title>
The following section will change the title of the page:
<h1><a href="index.html"><strong>Multiverse</strong> by HTML5 UP</a></h1>
I changed mine to this:
<h1><a href="/"><strong>Lauren</strong> Brumfield</a></h1>
That subtle edit from “index.html” to “/” changes what happens when I click on my logo or header. Keeping the index.html means that when I click on the header, my URL will contain a index.html at the end. Not a huge deal, but I didn’t want my domain looking like this: portfolio.labrumfield.com/index.html. So the quick fix of exchanging that with a “/” allows the linkup back to my homepage to carry out like normal, but I don’t get the index.html tagged to the end.
Physically, making the above edits did this to my title:

![]()
Adding the photos:
The Multiverse theme is very picture-heavy, so its important to know how it works. Within the subdomain folder, go to images. (For me, this looks like portfolio>images.)
My template has two folders in images. The “thumbs” are the thumbnails, or the photos you see at first glance when you look at the website. The “fulls” are what you see when you click on the enlarged photo.
Each photo has the following code in index.html:
<article class="thumb">
 <a href="images/fulls/01.jpg" class="image"><img src="images/thumbs/01.jpg" alt="" /></a>
 <h2>Magna feugiat lorem</h2>
 <p>Nunc blandit nisi ligula magna sodales lectus elementum non. Integer id venenatis velit.</p>
<article class="thumb">
 <a href="images/fulls/02.jpg" class="image"><img src="images/thumbs/02.jpg" alt="" /></a>
 <h2>Magna feugiat lorem</h2>
 <p>Nunc blandit nisi ligula magna sodales lectus elementum non. Integer id venenatis velit.</p>
You can see currently that the full image and the thumbnail image are both linked up to a file called 01.jpg and 02.jpg, respectively. So you have two options here.
- Upload all of your images (once in the “thumbs” folder and once in the “fulls” folder), rename them in file manager to match 01.jpeg, 02.jpeg, 03.jpeg, etc, and delete the stock photos. This option means you won’t have to touch the HTML code.
- Upload all of your images (once in the “thumbs” folder and once in the “fulls” folder) under the name of your choosing, and then edit the code for each photo.
No option is easier than the other, it’s just a preference thing. I chose option number 2, so here’s how I edited the code for my first and second photos:
<article class="thumb">
 <a href="images/fulls/flower.jpg" class="image"><img src="images/thumbs/flower.jpg" alt="" /></a>
 <h2>Flower</h2>
 <p>This is a picture of a flower.</p>
<article class="thumb">
 <a href="images/fulls/cupcake.jpg" class="image"><img src="images/thumbs/cupcake.jpg" alt="" /></a>
 <h2>Cupcake</h2>
 <p>This is a picture of a cupcake.</p>
This changed my first two pictures from this:

To this:

Note: File Manager doesn’t like capital letters & spaces. So if you decide to rename anything, keep it lowercased with no spaces.
Hopefully this gives a decent overview of editing a static HTML page while using a HTML5 UP template. If you need a refresher course on HTML, Codecademy is the bee’s knees.
Next post I’ll talk about contact forms in static HTML!